04). Augmentation
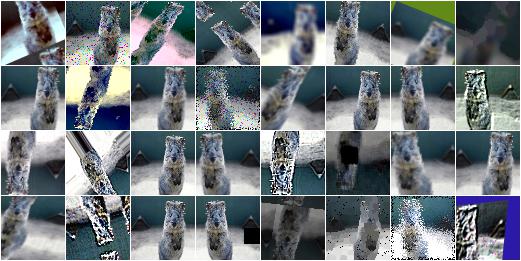
이번 장에서는 Object Detection 모델 학습 시 필요한 Data Augmentation 기법을 기술합니다. 기존의 Image Classification 문제에서 사용하는 다양한 Data Augmentation 방법을 거의 유사하게 사용합니다. Object Detection 문제에서는 하지만 이미지뿐만 아니라 Bounding Box도 적절하게 변환해야 합니다.
imgaug library
imgaug는 기계학습 모델 학습 시 Image augmentation 기법을 제공하는 아주 강력한 파이썬 라이브러리입니다. 기본적인 image augmentation과 keypoints, bounding boxes, heatmaps등 다양한 문제에 data augmentation을 적용할 수 있도록 편리한 기능들을 제공합니다.

Install imgaug
pip 명령어를 이용하여 간단하게 imgaug를 설치할 수 있습니다.
# install requrements
pip install six numpy scipy Pillow matplotlib scikit-image opencv-python imageio Shapely
pip install imgaug
프로젝트에 적용
아래는 train.py의 일부 코드입니다.
seq = iaa.SomeOf(2, [
    iaa.Multiply((1.2, 1.5)),  # change brightness, doesn't affect BBs
    iaa.Affine(
            translate_px={"x": 3, "y": 10},
            scale=(0.9, 0.9)
    ),  # translate by 40/60px on x/y axis, and scale to 50-70%, affects BBs
    iaa.AdditiveGaussianNoise(scale=0.1 * 255),
    iaa.CoarseDropout(0.02, size_percent=0.15, per_channel=0.5),
    iaa.Affine(rotate=45),
    iaa.Sharpen(alpha=0.5)
imgaug를 이용하면 object detection 모델을 학습 시 data augmentation을 아주 손쉽게 추가할 수 있습니다. Multiply, Affine, AdditiveGaussianNoise 등 다양한 Augmentation 방법을 간단히 리스트에 추가하는 방식으로 사용할 수 있습니다. (사용 가능한 augmentation 명세는 imgaug API를 참고하시기 바랍니다)
composed = transforms.Compose([Augmenter(seq)])
train_dataset = VOC(root=data_path, transform=composed, class_path=class_path)
train_loader = torch.utils.data.DataLoader(dataset=train_dataset,
                                            batch_size=batch_size,
                                            shuffle=True,
                                            collate_fn=detection_collate)
그리고 Dataset 클래스의 파라미터인 transform을 이용하면 DataLoader가 데이터를 반환할 때 augmentation이 적용된 데이터를 반환합니다.
다음은 augmentation.py의 일부 코드입니다.
def augmentImage(image, normed_lxywhs, image_width, image_height, seq):
    bbs = GetImgaugStyleBBoxes(normed_lxywhs, image_width, image_height)
    seq_det = seq.to_deterministic()
    image_aug = seq_det.augment_images([image])[0]
    bbs_aug = seq_det.augment_bounding_boxes([bbs])[0]
    bbs_aug = bbs_aug.remove_out_of_image().cut_out_of_image()
    normed_bbs_aug = GetYoloStyleBBoxes(normed_lxywhs, bbs_aug, image_width, image_height)

    return image_aug, normed_bbs_aug
augmentImage() 함수는 원본 이미지와 원본 레이블을 입력으로 받아 augmentation이 적용된 이미지와 레이블을 반환합니다. augmentation 의 종류는 seq에 기술되어 있으며, augment_images() 함수가 이미지를, augment_bounding_boxes()가 레이블인 bounding box의 augmentation을 수행합니다. augmentation 수행 시 이미지를 벗어나는 레이블이 있을 수 있는데, remove_out_of_image().cut_out_of_image() 함수를 통해 이미지를 벗어나는 레이블을 제거하거나 수정할 수 있습니다(아래 그림).

VOC 클래스의 파라미터인 transform은 데이터 전처리를 담당하고 있습니다. transform을 사용하면 아래의 예시처럼 torchvision.transforms에서 제공하는 다양한 전처리 기법을 사용할 수 있습니다.
import torchvision.transforms as transforms

transform = transforms.Compose(
    [transforms.ToTensor(),
     transforms.Normalize((0.5, 0.5, 0.5), (0.5, 0.5, 0.5))])
하지만 우리는 그것보다 훨씬 더 강력한 imgaug 라이브러리를 사용합니다. Augmenter(seq)는 seq에서 명세한 data augmentation을 수행하는 Augmenter 클래스입니다. dataloader 클래스에서 transform 함수가 호출될 때마다 Augmenter 클래스는 Decorator로 동작합니다.
# train.py
composed = transforms.Compose([Augmenter(seq)])
train_dataset = VOC(root=data_path, transform=composed, class_path=class_path)
# dataloader.py
if self.transform is not None:
            img, aug_target = self.transform([img, target])
            img = torchvision.transforms.ToTensor()(img)
데이터를 학습에 사용해야 하므로 반드시 ToTensor()를 통해 이미지를 PyTorch Tensor로 만들어 줘야 합니다.
# augmentation.py
class Augmenter(object):

    def __init__(self, seq):
        self.seq = seq

    def __call__(self, sample):

        image = sample[0]  # PIL image
        normed_lxywhs = sample[1]
        image_width, image_height = image.size

        image = np.array(image)  # PIL image to numpy array

        image_aug, normed_bbs_aug = augmentImage(image, normed_lxywhs, image_width, image_height, self.seq)

        image_aug = Image.fromarray(image_aug)  # numpy array to PIL image Again!
        return image_aug, normed_bbs_aug3

이 저작물은 크리에이티브 커먼즈 저작자표시-비영리-동일조건변경허락 4.0 국제 라이선스에 따라 이용할 수 있습니다.